Power Support AFP Crystal Film set for iPad 2

27 07 2011

Despite having a folio casing, I still feel insecure about the protection for the iPad 2’s screen, and hence started to look for reviews for a good screen protector to insure one of my more expensive investment. Before searching for one, a first decision will have to be made: anti-glare or crystal?

Anti-glare provides more resistance against smudges, fingerprints and reflection, while at the expense of the “prism” effect and slight loss of fidelity in colors. On the other hand, crystal or clear protector allows for more vibrant colors, with the downside of being a fingerprint magnet. Ultimately, it depends on one’s usage. If the iPad is often used outdoors or fingerprint haters, the choice will be an anti-glare film. For me, since I’ve decided to use it more for editing photos and colors matter more to me than anything else, the choice will be a clear film. After all, fingerprints are usually invisible when the screen is on (unless you have really oily fingers).

Screen protectors for iPad in Singapore generally ranges from 10+ dollars to 50+ dollars, and after doing some research online, it seems that the more recommended ones are those from SGP, Power Support and Moshi. SGP and Power Support offers both anti-glare and crystal protectors, while Moshi only has the anti-glare iVisor. Having bought the Power Support AFP Crystal Film set, I decided to write a short review on it, since I don’t see any reviews on it so far.

USA Website: http://www.powersupportusa.com/accessories/ipad-2/crystal-film.html
Japan website: http://www.pawasapo.co.jp/products/ipad/pip01.php?category=ipad

The set consists of the protector and a piece of cleaning cloth, similar to most other protectors. With my own cloth and a blower (for my camera equipment), I tried to make the screen of the iPad as dust free as possible. I then lay the film on the screen to check the alignment, so that spaces on all edges will be equal. Carefully peeling off a quarter of the film backing, I aligned the edge properly before slowly removing the remaining backing. With a cloth wiping down as I pasted the protector, only minor bubbles appeared towards the edges, which can be easily squeezed out. All in all, application was easy (the blower was necessary) and fuss-free for me.

With the film in place, I did a few quick “tests” by sliding my fingers across and trying to simulate some typing on the screen. To my surprise, the texture of the film feels slightly smoother than without, and resistance against fingerprints were quite good as well, way better than the naked screen. With the screen turned on, colors is good and vibrant, as expected from a crystal film, so no complains about this. In fact, I am currently typing this blog on my iPad, and switching off the screen halfway shows very little fingerprint smudges, which is definitely a bonus for me.

Apologies for the long story and short review, but this screen protector is definitely recommended by me, despite the high price of 50+ bucks. After all, most of us only requires one screen protector in the lifespan of an iPad, so why not invest in a good one?


Workaround for Windows 7 UAC Exclusion List

2 05 2011

With a fresh installation of Zend Community Server and Zend Studio on Windows 7, I was wondering why files saved inmy htdocs folder (in Zend Studio) are not appearing in Explorer. No prompt/error messages were given, and I later found out that I have to run the application as administrator in order for it to work properly. As with Windows 7’s UAC, running an application as an administrator will result in a prompt, which starts to get annoying especially on frequently used programs.

And so I found this link on the Internet, which provides a workaround by using a Scheduled Task shortcut to launch an application and bypass the UAC prompt.

http://creating-windows7-shortcut.articles.r-tt.com/

Credits to the author for his post. I have copied the steps below in case the website gets taken down.

Step 1

Click the Windows Start Orb and type “Task Scheduler” into the search bar. Choose Task Scheduler when it appears.

Step 2

Click the Action menu and choose Create Task…

Step 3

Name your shortcut by typing something memorable and descriptive in the “Name” field. For example, if you were creating a shortcut for a program that clears the history from your system, name it “clearhistory.”

Step 4

Under the “Security Options” header, make sure that the option that reads “Run with highest privileges” is checked. This will run the program as an Administrator.

Step 5

Click the Actions tab.

Step 6

Click the New button in the bottom-right. In the Action drop-down menu, choose “Start a program.”

Step 7

Browse for the application or shortcut that you want to run without using UAC controls.

Step 8

Click OK.

Step 9

Click the Conditions tab. Make sure “Start the task only if the computer is on AC power” is unchecked.

Step 10

Click OK to save the task.

Step 11

Return to your Windows 7 desktop and right-click any blank space. Choose New > Shortcut…

Step 12

In the text box that reads “Type the location of the item,” type in:

Schtasks /run /tn “clearhistory”

Or, substitute out “clearhistory” with whatever you named your shortcut in Step 3.

Step 13

Click Next.

Step 14

Give your shortcut a name and then click Finish.


First Take on Starhub’s TV on Mobile

12 06 2010

2 Weeks ago, I received an email from Ripplevox stating that I have been selected to trial Starhub’s TV on Mobile service. Being a first-time owner for a smart phone (Samsung Spica), I was eager to try out various functions or multimedia features that a smart phone can offer, so this the offer came at the right time.

As the program for watching the TV was not pre-loaded on my current firmware, I did a search in the Android market, and the first result returned was ‘Starhub TV’ by SPB Software.  Initially after installing the software, I could not get the channels to load, which I believed that it has something to do with my APN settings. Under the FAQ on Starhub’s TV on Mobile page, under point 8 and 9, it stated that “GEE! 3G/GPRS” has to be selected as an access point, which worked after I configured the APN. Perhaps it would be better if Starhub can create a section for configuring various phones, or put this point at the top of the FAQ.

The interface of the program is easy to use and understand. In a portrait mode, the preview window is on the top, followed by the schedule of programs and a scrollable bar containing the various channels. From the first glance, it seems that quite a variety of channels are being offered. Clicking on the icons will bring up the preview and schedule of the respective channels.

During playback, pressing the menu button will bring up a list of options, such as switching between a high and low quality video, adjusting the brightness, volume, channel list.

To sum it up, my initial experience with the TV on Mobile is good, mainly because it’s simple and straight-forward to access various channels. As I am currently staying in the school hostel, opportunities to test TV on Mobile is limited, but once I move out of my hostel next week, I will have more chance to test the service when I’m in the bus or on the train.


Making Java Work in Browsers on a 64-bit Windows

8 12 2009

Having just installed Windows 7 x64, I was wondering why a fresh installation of JRE (Java Runtime Environment) does not work in my Internet Explorer/Firefox. After a while, I kind of figured it out.

It is simply due to the wrong version of JRE that I had used. Call it a dumb mistake, or part and parcel of learning. The JRE downloaded was intended for 64-bit operating systems, whereas IE8 and Firefox are 32-bit applications, so naturally it will not work. The solution, download a 32-bit version of JRE, and voila, everything works again.


Prevent Page Scrolling When Using a Null Hyperlink

17 11 2009

For most of us, using a link as a method call is as simple as follows:

<a href = ‘#’ onClick = doAction() > Link! </a>

The problem is, when the link is located beyond the first page (which requires scrolling down), clicking on this hyperlink will bring the user automatically to the top of the page. A simple solution will be to return false from the onClick event:

<a href = ‘#’ onClick = doAction(); return false;  > Link! </a>


Awkward Controls with the Wii Zapper

4 11 2009
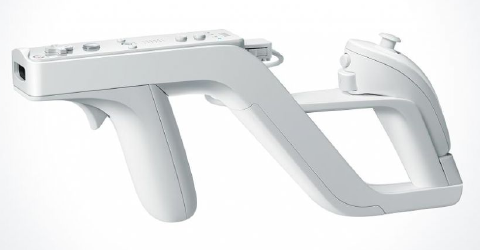
Wii Zapper

The Wii Zapper

The Wii Zapper was a very good invention to showcase the light gun functionality of the wii-mote and nunchuk. Essentially the Zapper is just a housing for the controllers, thus there is no need to worry about the gadget failing you as there are no electronics.

When using the Zapper, the wii-mote fits nicely in the front portion of the housing, with a spring lock to hold the controller in place, while the nunchuk goes to the back to become the ‘handle’ for the gun. A small compartment can also be found below to hide the wires from the nunchuk, so that minimal wires will be exposed and dangling. The Zapper is designed such that the ‘B’ button on the wii-mote becomes (or it appears to be) the main trigger for the light gun. The game that came with it, Link’s Crossbow Training, also uses this front button as the trigger.

However, it seems that most game makers (not all) have followed after Nintendo in using the ‘B’ button as the main trigger. Link’s Crossbow Training was a relatively simple and straightforward game to showcase the use of the Zapper, but in more complicated games such as Resident Evil: Umbrella Chronicles, it becomes hard to aim with swinging actions to reload and more buttons to press, which makes the Zapper kind of awkward to use.

Instead, the ‘Z’ button on the nunchuk is better positioned as the main trigger, so that  the hand pulling the trigger will be at the back and the front handle/trigger functions as a support and secondary button. So game makers utilising the Zapper, please reconfigure your controls! This will definitely make the game more fun when using the Zapper.

Despite most games using the awkward control configurations, it is still good to have the Wii Zapper as one of the essential Wii accessories. Having compared with third-party Zappers, the original Zapper is much better in terms of built, finishing and quality, which justifies its price over the third-party variants (~$10 more). Furthermore, the Zapper looks cool, the first impression most of my friends had when they first saw it.